http://usa.autodesk.com/adsk/servlet/pc/index?siteID=123112&id=14943677
Wednesday, December 29, 2010
Why getting into Architectural Drafting might not be a good idea....
http://usa.autodesk.com/adsk/servlet/pc/index?siteID=123112&id=14943677
Saturday, December 18, 2010
Yet another Golden Rule broken....again
"If you draw everything, then there is less surprises in store for you!"
Recently, I had to draw a simple platform next to a dust extractor. The purpose of the platform was to enable maintenance persons to get access to Stuvex bottles. These bottles are an anti-explosion device and as far as I know, sense and explosion and release some sort of dampening gas so the explosion is nullified.
Just to make life complicated, it was located up alongside an old wall, which had pipes, electrical trunking and so on either side of a corrugated iron wall. I have found out the hard way, that it is easy for a draftsman to say- "This pipe will be in the way....it will have to be moved." "Yeah, but, where to?!" Easier drawn than done it appears.
The platform ended up being on 2 levels, and the lower one looked fine in the plan view: Yes, fine until you asked yourself: How to get it in that place? Fortunately, the man on the job is highly intelligent and made it bolted so it would fit in. Except there was a brace, not drawn, apparently in the way. Not a big deal, it can be relocated, but to have noted this on the drawing would have saved drafting embarrasment.
Which highlights a problem found often in drafting: You need to bash together a concept drawing, and then go through numerous changes to the design before it solidifies. By the time that happens, you are quite convinced that your drawing is accurate and wonderful.
At this point the thing to do is kick your own butt out onto the site and site check your critical dimensions. I do this now by forcing myself to put these dimensions on the drawings and putting heavy boxes around critical dimensions.
I guess the lesson I'm slowly learning here is that the initial site measuring should be thorough and accurate and not to trust old drawings, even ones that were done by yourself.
Finally, a quote sent to me that seems on the nail:
"We moderns have managed to combine an incredible mastery of technical knowledge and information with an astonishing ignorance of the traditional wisdom once possessed by an illiterate village elder, and evident for all to see on every page of history.
Spend more than you earn and you’ll go broke.
Give someone something for nothing, and he’ll soon expect something for nothing on a regular basis.
Fail to hold people accountable for their bad behavior, and they’ll continue to act badly.
Give people an excuse to fail, and they’re more likely to fail.
Let aggression go unpunished, and you’ll get more aggression."
-Bruce S. Thornton
The guy who sent me this one made the following suggestion:
(except substitute 'we moderns' with 'dimwitted lefties')
Saturday, November 27, 2010
He hates Autocad....not really...Part 2 of Excel to Autocad
Saturday, November 20, 2010
He hates Autocad down by the sea shore...
This is done by means of PLC's (Programmable Logic Controllers). My knowledge of these is limited to the following:
They have cabinets, and in these cabinets are "racks" and in the racks are "cards".
The cards are where the wires from say a relay are connected to. It appears Fred is quite OK with Excel and happily puts all his stuff into a spreadsheet. If the electricians were happy with this, instead of a drawing, then life would be easy.
But no. They like drawings, done in Autocad because that has been the way of things for quite a while. Recently, he gave me some drawings to update, which involve me typing hundreds of times the same thing over and over again. Words like REMOTE and FAULT. I have now requested we get a program called "Active Words" which just stores up your keystrokes and you can allocate hot keys to them.
This all triggered an idea (no doubt not new!) to see if I could give Autocad an Excel connection.
The plan was to have a spreadsheet all set up with buttons on it to make filling it out a quick thing, then a button to generate an Autocad script file. I did this once years ago, and have no idea where all the files ended up, so thought it might be fun to do a new approach. It is summer here now in Auckland and maybe fun might be getting out to the beach.
Another wasted weekend later, I have a bare bones setup that works. It was a struggle with Microsoft Excel 2007, as I was used to the 1997 version. Little differences like: you have to have a macro enabled file type, the ribbon where things seem to be never where you think they might be. Plus, if you want VBA, you have to add the "Developer" tab to the ribbon.
Here is a screen shot of the spreadsheet:
This is a snippet of the VBA screen, showing part of the code:
This one here shows a line of script generated lines and text:
Saturday, November 6, 2010
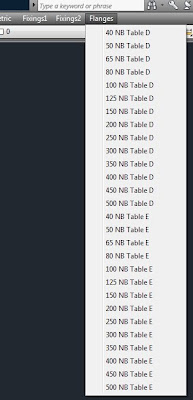
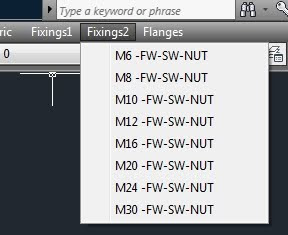
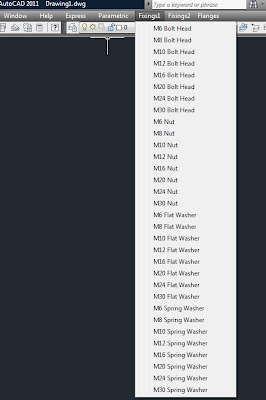
Menu Pulldowns
***MENUGROUP=BILRO1
***POP13
[Fixings1]
[M6 Bolt Head] -insert;"C:/cad/library/3D/fixings/bolter/m6headb";\1;1;0;
Then save it as not a text file, but with a ".mnu" on the end so the file name ends up something like Bilro1.mnu.
Sunday, October 24, 2010
Video Postings
I have been sort of busy doing some videos of my window frame drawing lisp set.
The above is an experiment to see if video embedding works.
The other videos can be found on youtube, just type bilrocad into the search box.
We had a long weekend here in Auckland, and I have been trying to find out how to stop huffing sounds when doing a video. (Maybe I should get a life? ...or paint the fence???)
For probably equally strange reasons I started doing a test of my Autocad skills on Brainbench, but made a bit of a hash of it and got a case of the "can't be bothereds" half way through. If you are tempted to do the test, make sure you have Autocad up and running before you start!
Friday, October 8, 2010
Sort of Autocad, and who is Nate Holt anyway?
So I know what a relay is etc, but how everything hangs together and why is a bit of a mystery to me.
Recently, I tried to look for a lisp that would allow me to align some text, and in the process of looking ended up at a blog page of a man called Nate Holt. My first reaction was: "Wow! This guy can really do a good job explaining things!" Check out his blog yourself at:
http://nateholt.wordpress.com/2010/08/24/add-sounds-to-your-too-quiet-autolisp-utility/
On digging a little deeper, it turns out he is someow connected to Autocad Electrical, that is a "vertical" of Autocad, meaning it tacks on or adds to standard Autocad. Which led me to:
http://download.autodesk.com/us/autocadelectrical/adm717_build_2006-07-21a/index.html
I had a look at some the videos, and have come away quite convinced that this would be the way to go if you had to do Autocad Electrical drawings.
Last week, one of my co-workers popped his head up and asked:
"Hey, how come I have updated the file on my desktop and the other one has also updated?"
I cannot claim the high ground here, because it was about 5 years ago that I discovered that Windows Explorer loves to duplicate the display of it's folders, only to be told "Everyone knows that!" Which apparently is not true, because this man did not know either.
Whoever made Windows Explorer decided to make it "easier to use" and in the process removed it's logicality. By the way, in case you did not know, you can access Windows Explorer by right clicking the Start button.
Here is the top level of the "Desktop" shown in Windows Vista, notice the folder called Pictures:
Double click on Pictures and you get a view of the folders in there:
Then, close everything up and you get:
Next, double click on Computer and then open up Users:
Now double click on Pictures....there are the same damn folders!
Which reminds me of the Microsoft Helicopter Joke:
A helicopter was flying around above Seattle yesterday when an
electrical malfunction disabled all of the aircraft's electronic
navigation and communication equipment. Due to the clouds and haze
the pilot could not determine his position or course to steer to the
airport. The pilot saw a tall building, flew toward it, circled, drew
a handwritten sign and held it in the helicopter's window. The sign
said "WHERE AM I ?" in large letters.
People in the tall building quickly responded to the aircraft, drew a
large sign and held it in a building window. Their sign said, "YOU
ARE IN A HELICOPTER." The pilot smiled, waved, looked at his map and
determine the course to steer to SEATAC (Seattle/Tacoma) airport and
landed safely.
After they were on the ground, the co-pilot asked the pilot how the
"YOU ARE IN A HELICOPTER" sign helped determine their position. The
pilot responded, "I knew that had to be the MICROSOFT building
because they gave me a technically correct but completely useless
answer."
Sunday, September 26, 2010
Blocks versus lines and things
Only problem is, that he wanted to generate more sections based on them, things got a little messy, to the point where he must have said to himself:
"Funny? That dimension should have been 139mm....it is not actually that, on this model....oh well, let's just do a quickie here and alter the dimension text to read what I want instead of what it actually is".
Where's my big hammer?
The trouble is, when you are designing, it is wonderful to use lines etc, but once you have zeroed in on a particular size, make it into a block, so you don't inadvertently stretch it, plus you can reuse it, confident in knowing that it is a set piece of geometry.
I'm thinking here of a sectional view of a window sash.
Saturday, September 18, 2010
Video Productions and old 2D lisps
http://bilrocad.com/Lisps2d.html
I have also posted some ancient 3D ones on:
http://bilrocad.com/Lisps3d.html
It struck me that some of these are hard to use(!), so I have done a few videos, creating a special page for them at:
http://bilrocad.com/Videos.html
It was a bit of a learning curve doing them - they ended up with huge file sizes, so I downloaded a free converter and condensed them a bit.
Before 2000, I was interested in Virtual Reality Modelling Language (VRML) and sort of expected that this would evolve into something useful around about now. It appears not....although maybe I have not looked hard enough. I looked at all the old sites and most of them seem to be stuck around 7 years ago. Octaga seems to be the only one still chugging.
Saturday, September 4, 2010
Revisions...the last post...I promise! and Working with XREFS
About a year back I raved on about revision problems created by the fact that a drawing file might contain many layout tabs, where sheet 1 might be rev B and sheet 2 might be rev D.
My approach for the last year, which I now admit is one that has a major fault, was to remame the actual drawing file name so it reflected the fact that it was a later revision. For example 150283D.dwg. The "D" would represent the most advanced revision. Into a folder marked "History" went the old files, for record purposes.
This worked well until the man in charge of maintenance requested that we go back to the old format of 150283.dwg, because he had that number listed in his database package called Mainpac.
As well, the principle of Xreffing goes astray if you start changing file names. Xreffing is something I had avoided because people in the future would come unstuck if the masters of IT ever changed a name of a drive. (They would never do that....would they?)
If they replace me in the future, then part of that person's job is to understand the concept of xrefs and how to fix them if the drive is reanamed. With this in mind, I have started to use them sparingly.
A Different Way of working, using xrefs
We have a 3D models of the plant in a folder marked "Plant-3D Models". Each major building has a name, eg "Melthouse" and the file name is the same as the building name.
My idea is to gradually build these up so that they represent a true and more or less accurate model of what is currently there. In these models, there are section tools, which write out 2D sectional views to the appropriate folder.
Our setup is further complicated because we have 2 sets of drawings-One for proposals and one for things actually built. So if something went from a proposal to reality, I would have to change my xref paths. A further gotcha is my 3 step method:
- Model with section tool.
- Outputted section file.
- Presentation drawing with outputted section file xreffed in.
I have mentioned this in previous posts, but not in the same format!
At the moment this system seems to work, but sometimes the model gets cumbersome. For instance I might be working on the basement area, and you tend to trip over all the other stuff just looking at that. I'm thinking of a lisp routine that freezes layers according to their names- for instance Level1-Plant might get hidden when I want only level2 stuff showing. Yes, this can be done with layer filters and the layer manager. The trouble with the layer manager is that it seems to choose to turn off layers and not freeze them. As well, if you create new layers, you have to update the layer definition in the layer manager.
There are other problems: The detail required of a large plant layout is usually better to be of a low level, whereas for say a tank, I usually make this quite detailed. How to mix and match the two? I don't have an answer as yet. Possibly the answer lies in a 64Bit machine with 12Gigs...?
Wednesday, September 1, 2010
Handrails and Stairs....Lisps
If you wonder what these may be about, check out Utube, with bilroCAD in the search box.
Kind of makes me wonder what planet I was on when I thought maybe I could make a small amount of money doing this sort of thing.
Maybe the problem is that if you look hard enough, you can get all sorts of stuff for free.
So I have decided to not be so precious about them and have stuck them on my web site at
http://bilroCAD.com/Lisps3d.html
If you delve into them you might find (if you are a purist) that some of the programming looks a bit ham fisted. However, they do work most of the time! What do you expect for free? Just to add to the fun, looks a bit shonky when you see that I have put "these do not conform to any known standard"!
I have just spent about 2 days trying to get the handrail one to work with R2011. After much harrumphing I created a special one, just for R2011.
I'm pretty pleased with the handrail one, but the stair one could do with all sorts of things added:like footplates, top-plates, handrails and a sytem for variable depth treads, and some way of tying it in with the New Zealand Building Code. It produces stairs which have a rise x going of 46500, which is not how the NZBC does it, so this lot is going to have to be revisited big time soon!
I like to have just one version of Autocad, so it is quite annoying to have things that work on one version but not another.
Tuesday, August 31, 2010
Instructions....YAWN.....how exciting...
I have sent the routine to a man, where he lives I don't know, but he has had an uphill battle to get the thing to work. Part of the problem is the method Autodesk used when it first designed lisp routines with dialog boxes. They made it so the main program was in one file, say HRAIL.LSP, and the dialog box was another file, say HRAIL.DCL. The usual problem is that Autocad cannot find where the dcl file is located. They probably had good reasons for their decision, but it has made it tricky for all from then on.
Here is the offending code from the lisp file:
(setq dcl_id (load_dialog "C:\Program Files\AutoCAD 2002\Lisp file\Holes/HRAIL.dcl"))
(if (not (new_dialog "hrail" dcl_id))
(exit)
)
Autocad does not like it’s slashes “\” as in the old msdos days. You have to do it their funny way, ie “/”
So the corrected bit will be:
(setq dcl_id (load_dialog "C:/Program Files/AutoCAD 2002/Lisp file/Holes/HRAIL.dcl"))
(if (not (new_dialog "hrail" dcl_id))
(exit)
)
I'm hoping this fixes the problem.
Sunday, August 29, 2010
Them there pesky round viewports
For instance you might want it to plot with conceptual shading.
It can be done as follows:
Right click on the viewport and choose properties. You will see 2 items (one is the circle) are selected because the little drop down at the top says "All(2)" , next, click the little triangle to show the drop down. Pick viewport.
Now you can see the properties, so choose conceptual for the plotting of the viewport.
Saturday, August 28, 2010
Other CAD programs
Saturday, August 14, 2010
Photofly and Accessing Blocks
I have given photofly a bit of a try, and a series of pics of a boilerhouse produced something, but I'm not all that pleased with my results. I have to put my hand up here to say it is most likely the way I took the photos.
I questioned some drafting friends and they said accessing blocks was not a problem for them. Apparently I'm an old fuddy duddy because I use the scroll bar in Windows Explorer. The thing to do is to get onto the directory, then hit say "f" for "fixings" to get to the fixings directory.
The result of this must be: "Can you teach an old dog new tricks?"
Woof.
Monday, August 9, 2010
Ouch!.....Again!
The latest drama is a lisp routine, which while seeming to do the job, was not really.
The routine in question is a round flange drawing one. The problem was that while I keyed in a pitch circle diameter of 295mm, it took it upon itself to draw one at 297.82mm or so....Nasty, because the flange looked ok.
The lesson learned? Make sure any routine that draws anything sets the osmode (ie the running snap value) to ZERO. ie to achieve this , use the following code:
(setvar "osmode" oldsnapmode);this is so that you can reset at the end
(setvar "osmode" 0)
Here is the routine, if you like such things, cut and paste into notepad,
call it flan3d.lsp and load it by dragging it from explorer into your autocad drawing.
To run, type flan3d at the prompt.
;Program written by Bill Le Couteur
;Auckland NZ
;Rev 0 date 16/6/00
;This program draws a flange in 3d
(defun c:flan3d()
(setvar "CMDECHO" 0)
(setq oldsnapmode (getvar "osmode"))
(setvar "osmode" 0)
(setq flangeod(getreal "\nEnter the outside diameter: "))
(setq flthick(getreal "\nEnter the Thickness: "))
(setq flangeid(getreal "\nEnter the Internal Diameter : "))
(setq boltholedia(getreal "\nEnter the Bolt Hole Diameter: "))
(setq boltpcd(getreal "\nEnter the PCD: "))
(setq no_holes (getint "\Enter the number of holes: "))
(setq boltpcr (/ boltpcd 2))
(setq the_point (getpoint "\nPick the point to draw it: "))
(command "cylinder" the_point "d" flangeod flthick)
(command "cylinder" the_point "d" flangeid flthick)
(command "cylinder" the_point "d" boltholedia flthick)
(command "move" "l" "" "0,0" (list boltpcr 0))
(command "array" "l" "" "p" the_point no_holes "" "" )
(setvar "osmode" oldsnapmode)
(setvar "CMDECHO" 1)
(princ)
)
Tuesday, July 27, 2010
The end to grumpiness and Photofly
Try Photofly from Autodesk Labs. More on this next post.
Monday, July 26, 2010
Grumpy with frustration
Take for instance today, where I am drawing a tank, and want to put some adjustable feet on it.
Easy you say: just pick one already drawn and pinch the feet off that. Ok, but these are M12 A-justa feet, and they look a little puny on this particular tank. So off to the internet and go to the manufacturer's site. Hmmm....this site is a "restricted site"..cannot think why.
Fortunately I have a fairly big library, and locate a brochure I downloaded about 3 years ago.
Humff..have to draw an M16 one.
Hang on a minute! This is drudge drafting...really annoying...is this 2010?..or have I somehow managed to time travel backwards?
My point is that we are still living in the dark ages as far as CAD is concerned, in spite of all the wonderful things like lofting and sweeps that have been given to us. Well, not given exactly, I had to pay for upgrades...
Autodesk could really make things hum for themselves and knock their opposition around really badly: All they have to do is pay some poor person to cruise the internet, see that the product being sold needs drawings and just do them.
After that, post the drawings on some web site:anywhere will do! Then, tie this into Autocad somehow so that getting what we want is quick and easy.
For the curious, the firm that sells these feet is http://www.anzor.co.nz (no, I'm not getting paid for a bit of free advertising!)
There are about 3 main ways that I'm aware of to enable swift insertion of blocks and I use all 3 in this order:
1. Windows Explorer- always open on my second monitor.
2. Tool Palletes, again, always open on the second monitor.
3. Drop down menus.
None of these is that wonderful. There has to be a better way.
Tuesday, July 6, 2010
The Draftsmans Daily Struggle
Consequently, I'm frequently telling myself a warm office is a good place to be!
Sometimes I believe me, but I would rather be curled up at home with a good book.
Recently at work I have been asked to do a drawing showing how the hot water piping is run throughout the plant. In a previous go at this, I had a 3D model, which I exploded into lines so that everything was "X-Ray vision".
This did not work out that well as you ended up with a forest of lines which had to be grey to fade into the background. So the latest attempt involved getting a 3D model of the plant and
running my pipes around that. The buildings are just "shells" to minimise clutter, and I xref in the bits of plant that I have drawn previously.
Still not the ideal solution, and just seems a struggle.
The plant is here: http://www.chelsea.co.nz/content/about-chelsea/default.aspx
I'm starting to wonder if my approach is correct.
Saturday, June 12, 2010
Want to draw wooden windows then?
Saturday, June 5, 2010
Autocad as a desk-top publisher
Then the thorny question arose: How to put annotations on a jpg? The silly answer is of course use Microsoft Paint. Silly, because it came out looking like crap!
Once upon a time, I had my own computer at work and my own copy of Corel Photopaint, which would have done the job. Unfortunately, I now work on the firm's supplied computer and the preventers of information technology dept have it so you must ask for such software to be installed. It can be done, but the thought of all the forms and fighting bureaucracy put me right off.
Then the penny dropped: why not use Autocad? Just drop the jpg into modelspace, put the annotations in paperspace-easy.
Thursday, May 6, 2010
A CAD Standard
Unfortunately in the process of getting it here all the formatting is gone....but the info remains!
Introduction
This procedure provides a basis for
This standard also lists the changes to the AutoCAD configuration, and forms a basis for layers, text styles and system variables as required.
All drawing numbers to have prefixes as follows:
L=Layouts
P=PI & IDs
E=Electrical
S=Process Flow Diagrams
Paper and Model Space
Place entities as follows:
Paper Space
Title Block at 1:1 Scale
Annotation Text/Dimensions for 3D Views
Parts Lists
Model Space
Object outlines
Dimensions
Annotation Text for 2D views
Sheet Sizes
Drawings to be on A1 Title Block, and usually this is printed on at A3. This means the 3mm high normal text comes out at 1.5mm printed.
Units
All units in millimetres
Plotted Line Width
ALWAYS AN ENTITIES COLOUR SHOULD BE "BYLAYER". Hence whatever layer an entity is on controls its plotted line width
Plotted widths to be 0.05mm, 0.2mm, 0.45mm
The only exception is dimension lines, these are forced to white for the lines only.
Plotting and Scale of Entities
Plot scale is controlled by setting the zoom factor while in Model Space, for instance if the drawing is to be 1:5 scale, you would go to paper space, then enter Model Space by double clicking in a viewport, then type "ZOOM" "1/5xp". Then double click outside the viewport anywhere in paper space to get out of the viewport.
All entities to be drawn in Model Space to be full size, i.e. 1mm=1mm
Limits
These are set to an A1 sheet in the prototype drawing, and are up to the individual user to set, as they may prefer. Remember a grid will not show up unless limits are set to cover the area.
Layers
For Mechanical Drawings:
These are the layers normally to be used, and come already loaded on the prototype drawing.
Layer Colour Colour No Line type Pen Width (mm) For
0 white 7 continuous 0.05 Blocks written to file*
CL magenta 6 centerx2 0.05 Centrelines
DIM red 1 continuous 0.2 Dimensions
HID magenta 6 hiddenx2 0.05 Hidden Lines
HVY cyan 4 continuous 0.45 Heavy Lines
LGT white 7 continuous 0.05 Light Lines
MED yellow 2 continuous 0.2 Medium Lines
PH grey 253 phantomx2 0.2 Phantom lines
For Process and Instrumentation Diagrams (P&IDs):
Layer Colour Colour No
Valves yellow 2
Product red 1
CIP magenta 6
Equipment Major white 7
Equipment Minor grey 252
Instruments white 7
Instruments-Control white 7
Text white 7
Services-Gas light blue 140
Services-Chemicals Lt Green 83
Services-Liquids Dk Blue 145
Services-Compressed Air Lt purple 213
All linetypes are continuous for PIDs except for CIP, which is centerx2.
*NB When you write out a block to the library for other people to use,
put all of it on the 0 layer. In this instance you can make centrelines colour by name and
linetype not by layer. The advantage of this is that when someone brings it into a drawing, they
can put the block on a layer and it will show in that layer’s colours.
Plans and Elevations
These should always be in line with each other, ie if a vertical construction line is drawn through an item in the plan view, it should also go through the corresponding part on the elevation. This usually means that the view to the left of the plan view has the floorline running vertically up the page.
To make this view easier to work on just rotate your UCS by -90 degrees and issue the PLAN command. A lisp routine called RO90 will do this
automatically.
The commands are UCS, Z, -90, enter, Plan, enter.
Entity Creation Modes
Entity Mode
Colour Bylayer
Dimension line colour White
Dimension extension line colour White
Dimension Text Colour Bylayer
Dimension style "Standard"
Linetype Bylayer
Textstyle Standard
Dimension Variables, and System Variables
1. Ltscale will initially be set at 4 for the prototype drawing so that dashed lines show up.
2. Mirrtext should be set to 1,because you would never want mirrored text.
3. Dimscale will be set to 1 so that if you are starting a drawing at 1:1 you will not need to reset it.
Note that contrary to a lot of common practice, the units are set to 3 decimal places; not zero places as many people set them. The logic in this is that when machined items need 3 decimal places you do not need to reset the units. For normal whole dimensions, ACAD conveniently suppresses the trailing zeros-see the dimzin variable.
A noted drawback of this is that when you are dimensioning a hole in the middle of a piece of 75 wide flat, the dimension will come up as 37.5, giving rise to a tolerance of +/- 0.1mm which is clearly not desired. The fix of course is to enter the dimension manually at the prompt.
Linetypes
Use standard Autocad ACAD.LIN
Text
Heights and pen widths will be:
Entity Height Penwidth Colour
All normal text 3mm 0.3mm bylayer
Large text 4mm 0.5mm bylayer
Fonts
Use Arial
Scales
Category Recommended Scale
Enlargement scales 50:1 20:1 10:1
5:1 2:1
Full Size 1:1
Reduction scales 1:2 1:2.5
1:5 1:10
1:20 1:25
1:50 1:100
1:200 1:500
Item References
Shall use numbers, not letters. The text height will be 5mm high .The circle to be 10mm diameter.
Block Library
These are kept at
Various categories are used in this folder eg bearings\saeco
If drawing say a motor, have a dimensioned drawing showing 3 views,
plus separate plan, side and end views with no dimensions on.
Be verbose with filenames, eg do not put "150kw motor", put for instance:
"Electric Motor-Teco-315s-85r.-plan - 2D"
Issue of Drawings
Only the project engineer may issue drawings. A document transmittal (standard form) must go with the drawings and a copy kept in the job file. All drawings must be stamped as to their purpose e.g., construction, for information, for tender etc. The project engineer is responsible to see the drawings are checked in respect to design and dimensioning, before issuing any drawings. The project engineer must sign all drawings issued. A copy of any drawing issued is to be kept on a stick file specific to the job, while the job is in progress. Finalised drawings should be stored in the drawing cabinets.
Sections and Views
On any drawing sheet sections and views start at A and work forwards through the alphabet
Appendix
The following lisp routine sets up the layers for PIDs:
;Program written by Bill Le Couteur
;Auckland NZ
;Rev 0 date 18/8/97
;This program sets up layers
;the idea is that layer names are set ONLY
;by this routine...and this routine is run every time you open a drawing
;so if as a contractor you change employers, YOU ONLY
;HAVE TO CHANGE THIS ROUTINE
(defun c:laysetPID()
(setq the_layer (getvar "clayer"))
(setq layvalves "valves")
(setq layproduct "product")
(setq laycip "CIP")
(setq layequipmajor "Equipment Major")
(setq layequipminor "Equipment Minor")
(setq layinstruments "Instruments")
(setq layinstrumentscontrol "Instruments-Control")
(setq laytext "Text")
(setq layservicesgas "Services-Gas")
(setq layserviceschem "Services-Chemicals")
(setq layservicesliquids "Services-Liquids")
(setq layservicescair "Services-Compressed Air")
(command "-layer"
"m" layvalves "c" "33" layvalves
"m" layproduct "c" "1" layproduct
"m" laycip "c" "6" laycip
"m" layequipmajor "c" "7" layequipmajor
"m" layequipminor "c" "252" layequipminor
"m" layinstruments "c" "7" layinstruments
"m" layinstrumentscontrol "c" "7" layinstrumentscontrol
"m" laytext "c" "7" laytext
"m" layservicesgas "c" "130" layservicesgas
"m" layserviceschem "c" "111" layserviceschem
"m" layservicesliquids "c" "145" layservicesliquids
"m" layservicescair "c" "213" layservicescair
"m" "TEXT" "c" "120" "TEXT"
"s" the_layer "")
(command "-laYER" "t" "*" "")
(command "-laYER" "unlock" "defpoints" "")
(setvar "blipmode" 0)
(setvar "ltscale" 4)
(command "regenall")
(setvar "CMDECHO" 1)
(princ)
)
Monday, April 26, 2010
Process and Instrumentation Diagrams-P & IDs.
There seems to be all sorts of ways of doing a valve unsurprisingly: the ones on my site have little bits of line on the ends of the valves, and they have actuators built in. On his ones, the actuators come as a separate block. Some of them have invisible attributes, some don't.
They are also plainly "old autocad" in that there are no dynamic blocks at all. I have not been a fan of dynamic blocks for normal drafting, but I think they might be the best for PIDs.
If I get enthusiatic enough, I hope to post a set that could do pids.
It looks like a fertile field for lots of lisp macros. On that springs immediately to mind is a routine where you specify 2 points and a line is drawn between the two with maybe a continuation tag at one end and a valve in the line, already inserted.
You can pay for such things, but it seems most people don't, preferring to slog it out with plain Autocad.
There are all sorts of ways of doing pids- I like the tanks drawn in a heavy line-the engineer likes them in grey or very light so that the lines are the emphasis.
Anyone interested in a CAD standard? I have a very lightweight one that just covers the basics.
Maybe next post......
Thursday, April 22, 2010
Video Driver for Autocad Fun...not
I am lucky enough to have a quadro FX1500, so I duly updated it.
Somewhere along the line, and I'm sorry I cannot remember the exact sequence of steps needed, this all came unstuck. I had text that disappeared after moving, slow everything, viewports that went all funny. Just beore I thought to blame Autocad, I decided to check 3dconfig. There it had a choice of 2 drivers- One Autocad and one that looked like an invdia one.
I changed to Autocad and all was fixed.
Hope this helps someone!
Saturday, April 17, 2010
The disappearing draftsman, slips and trips, and DS and DIMLO
He explained that he found that he could use Autocad as a faster, easier way of producing a sketch of what he wanted than doing a hand sketch. Plus there was an added advantage that the draftsman was only required to do a short "tarting up". The last place he worked, there was a proper drafting department, and they were probably grumpy that he was doing part of their work.
Here at his new work, there is no drafting dept (only me, 2-3 days a month!). So he has to manage somehow.
I have done a few PIDs, but would hardly call myself an expert, so I was interested to hear his take on how they should be done. He reckons, at the quotation stage, you just insert symbols, and leave it at that. You do not use symbols with lots of hidden attributes so that at a future date you can extract a full Equipment List from the job.
The generation of tag numbers, he said, should be the preserve of the Electrical guys, who make a large database. When they have done their thing, and the job is a go, then you can put the tags on.
Slips and trips: I recently had a reasonably complex design to draft. It was a "bag massager".
I came unstuck in one of my drawings: the 20mm plates welded onto a 100x100 axle, somehow got moved by 100mm, this was only in the detail drawing- the main ass'y drawing was correct.
Which made me think: could this have happened in Inventor? Probably not. But I'm stuck with Autocad, so what could I do to prevent this happening again? My only idea is that I make it policy with any assembly to xref in all the parts.
DS and DIMLO: Yet another engineer, at a different plant, has arrived, and he seems keen on doing his own drawings. That is OK by me, because less time working=more time living. He seems pretty good, just a little polishing required in the dimensions department. Namely, he had large arrows and tiny text on his dimensions.
I explained to him the system I use-but I'm not sure he was at all in favour of it, which is to use 2 lisp routines, DS.lsp to set the text height and DIMLO.lsp to insert, then erase a block that has most dimensions styles a mechanical draftsman might need.
In the past done I have done things differently-see a previous post about zero height text.
Here are the two routines:
DS.lsp:
;This routine sets up for text to be right height
;By Bill Le Couteur
(defun c:DS()
(setq skale (getreal "Please enter the plotted scale: "))
(command "-style" "STANDARD" "ARIAL" "0" "1" "0" "" "" )
(if
(tblsearch "style" "R1")(command "-style" "R1" "ARIAL" "0" "1" "0" "" "" ""))
(if (tblsearch "style" "R1-25")(command "-style" "R1-25" "ARIAL" "0" "1" "0" "" "" ""))
(if (tblsearch "style" "R2")(command "-style" "R2" "ARIAL" "0" "1" "0" "" "" ""))
(if (tblsearch "style" "R5")(command "-style" "R5" "ARIAL" "0" "1" "0" "" "" ""))
(setvar "MIRRTEXT" 0)
(setvar "DIMSCALE" SKALE)
(setq the_textsize (* skale 3))
(setvar "textsize" the_textsize)
(setvar "dimassoc" 2)
(princ))
The nice thing about this is if you have an existing drawing an someone has used the style R5 say, then you can change that at the same time as well.
Here is DIMLO.lsp
;This routine sets up for dims and text;
By Bill Le Couteur
;imports a dummy block containing a set of dimension styles
(defun c:Dimlo()
(command "-insert" "c:/cad/library/symbols/dimension styles" "0,0" "1" "1" "0")
(command "erase" "l" "")
(princ)
)
A very simple routine-I have no idea why Autodesk don't have a magic button that does all this...
Of course, many will argue that you need to set up your prototype drawing nicely, with all the needed scales and the text the right size, and this is correct, except what happens when you change scales? As well, if you purge the drawing your nicely setup scales that are not used are ditched, so if you want to use a 1:20 dimension style, it won't be there.
Sunday, April 4, 2010
Autocad 2011
(By the way, there is a snipping tool in Vista-look under Accessories)
How to get your toolbars? Just to the right of the Quick Access Toolbar there is a small triangle.
Press this and locate "Show Menu Bar". Then go Tools/Toolbars/Autocad and tick the ones you want.
Another fun annoyance, was the helpful popups that appeared in the top right hand corner.
On pressing "Don't show me this again" it appeared yet again, and again. A friend told me that they were all different ones and that after a while all sorts would be eliminated. Makes sense, really, because you want your new users to be looked after.
A lot of new changes are not immediately apparent- for instance the loft command has been overhauled to allow for surface creation. Previously, the dialog box came up automatically, now you have to use the Settings option to make it come up.
As usual with new releases, I tread carefully, making sure I do regular backups.
The neatest things I'm finding are:
*The materials system has been overhauled and is looking good.
*Hatching has had a lot of work done on it and seems much better.
*Polylines are a lot nicer to edit - but old habits die hard!
*There is a new display bar on the right of the screen which has the often used orbit button on it, and the "Steering Wheel" which I have not been using but have been driven to because of it's handy little button marked "Center" which is great if you want to reset the orbit center graphically.
Wednesday, March 31, 2010
Title block pain
If you had 2 or 3 drawings you would just reinsert the block, redefining the old one. So you would think a script would be the go. This where I found out my ignorance regarding the insert command.
After some digging on the net I came up with parts to make this one:
-insert
A3BORDER_LAND_MECH=
Y
(command)
An explanation:
-insert ......just issues the insert command without the dialog box.
A3BORDER_LAND_MECH....is the name of the title block, and the = means that you wish to redefine it.
Y is the answer to the prompt "Do you want to redefine the block?"
(command) ....is a means of cancelling the script-does not make much sense but it works!
Just one catch-you have to put the location of the directory of the block in file locations in autocad. Go Tools/Options etc.
Just use the cui to make yourself a button and you just click when you want the block redefined.
Sunday, March 21, 2010
From igloos to elephants
More architectural monstrosities-yes I know the curves do not match, yes I know there does seem to be no means of support in some of these...but hey, it's Sunday and I have limited time!
Saturday, March 6, 2010
A draftsman's lot and architectural fantasies
I remember the story of one draftsman who drew an entire truckload of ducting. On the day it was delivered, he was looking out the window. As soon as he saw it he realised they were all completely wrong.
Another, an architectural designer, was awoken at 2 am in the morning. Apparently the irate person on the phone accused him of bad design of a deck because there had been a party and a large number of people were on the deck and it collapsed resulting in some injuries. A real shock to him, but he was later vindicated as it was found the builder had just nailed the stringer support to the house instead of using coach bolts!
Anyway, I seem to be sliding back into drawing houses for fun-it is great, just as long as you do not intend to build them!
The "flying saucer" one came from a vision I had of standing inside a house and looking upwards and seeing the sky: ie a hole in the roof! Hardly original. Maybe the glob below the hole made of chrome is though (probably not!). The "pears laid on the ground" one is again probably not original, but has the "looking at the sky while inside" thing going as well.
Saturday, February 20, 2010
Batch processing of Autocad drawings
Not really. He was after a system that would search electrical drawings for numbers. The reason for this is that say you have wire number 39 on one drawing, then you want to know where this wire number is on other drawings (maybe the drawing system is at fault here!). Just to add to the fun, some things are attributes, not text. Probably if you looked, you would find some mtext in there as well.
This is all hanging on your finding a thing that will open several drawings in succession.
I have looked, but most of them you have to pay for. To cut a long story short I found the ideal thing-just for opening up drawings: and for free!
I have tested it out by reinserting and updating a title block.
The number finding thing will have to wait.
The routine can be found here:
http://thatcadguy.blogspot.com/2009/10/batch-processing-autocad-drawings.html
There is a trick to it's use-Navigate to the directory, and then select the first file.
Otherwise, it works brilliantly, (yes, I did leave a comment).
Maybe someone at Autodesk might read this and consider putting it in Express Tools?
Saturday, February 13, 2010
Whats bin did and what's bin hid
Saturday, January 16, 2010
16 Days of Revit Left
My conclusion, and I admit here that it is not a very informed one, is that Revit is great if you are drawing multi-story buildings. I'm not so sure about ordinary domestic houses, except where you are happy to represent a roof structure as a slab. This is probably how it is used in real life?
Wednesday, January 13, 2010
How not to learn Revit...
This is how far I have got, in between having a day off and putting unwanted stuff on the local internet market.
Two conclusions:
1. Putting in walls and windows in Revit: easy.
2. Constructing floor structures and roof structures:a bit harder!
When it came to putting in the floor structure, things seemed to go a lot slower for some reason-most likely because I was doing things for the first time, and did not realise there was a multiple copy. (There is, you just have to look for the checkbox).
I downloaded a roof truss from somewhere but things came to a bit of a halt when I had to alter the existing family. This was when I realised that I had not quite understood families and creating them. So I spent most of the day trying to make a sloped rafter, even getting as far as making a bird's mouth at the lower end, which caused quite a few problems.
Maybe I have missed something, but I would have thought that a plain old rafter would have come with the package. It probably is, but is called something like "Structural Effects".
I can see that the English are on to the fact that the Americans speak American. For instance a "notch" in English is "coping" in American.
It has been a frustrating experience, but just reinforces what someone has said previously:"You can learn by yourself, but you will take less time if you have training".
After the last try, I found my rafter coming through as an elevation in a plan view, so I tossed the toys out of the cot and went and mowed the lawn. (Yes, I do know what I did wrong!)
Maybe I'm like a lot of those crusty old Autocad users: Don't show me anything new: my mind is made up. It just seems working in Autocad is wonderfully precise and extremely flexible: you can quickly draw anything you want. It's just that it is not parametric.
I seem to be stuck in the family editor, doing things the "correct" way (by my way of thinking!)
only to be greeted with error dialog boxes saying things like "reference dimensions are no longer parallel " and so on. Going to Youtube is no good as the tutorials there do not cover a sloping item such as a rafter.
As an Autocad user, you find yourself keying in things like "M" for move, when you should be pressing a button. Visibility states are another minefield for an Autocad user: there ain't no layers!
When you finally find out a way to hide something, it's gone forever because the way to get it back is not the same button or next to it!
Tuesday, January 5, 2010
Autocad to Revit...Notes of an Autocad user
Monday, January 4, 2010
On a video roll
handrails to be found at:
http://www.youtube.com/watch?v=XIJ4ZNz3rhk
I hope that I'm getting better at doing these- a friend suggested I work on a smaller
screen size and have the autocad background set to white, which seems to produce
a much better result.
Now, back to that Revit tutorial....
Sunday, January 3, 2010
Xmas Madness continues
So the mad part is I have downloaded a trial copy of Revit to see what it is about.
Just to be totally inconsistent, I downloaded Java netbeans integrated development environment as well.
It just allows you to "easily" make java programs. That is, if you can figure out what the heck is going on!
Even worse, I have downloaded a screen video capture program called CamStudio and after much searching for a microphone produced a video. The trick (I have not mastered it yet) is to have the settings so that the file size is low. It is just a short 3 minute demo of my pipe lisp.
It can be found at:http://www.youtube.com/watch?v=nZsVUjbRWO4