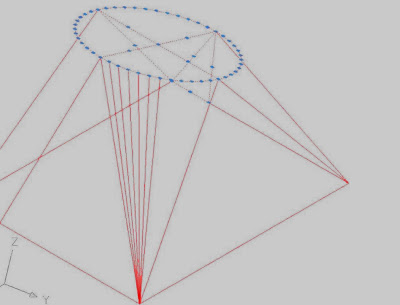
This might be handy for some: How to make a flat sheet metal pattern from a 3D solid in Autocad?
Well, as far as I know, it does not do it out of the box, unlike Inventor or Solidworks. I do not have these so I have to manage somehow.
Normal transitions can be done using 3rd party programs that do that sort of thing. Unfortunately, these do not handle special cases like the round outlet being on an angle, as well as being offset.
Back to basics: just draw the object in 3D and draw a series of lines in 3D to represent the folds that you want. If your metal thickness is 3mm, you would offset everything in 1.5mm ie half, in from the outside of the finished product.
Sounds easy? It is. Sadly it is extremely time consuming and tiresome. This is where some Lispy tricks come in handy, and while it does not do the full job, it does help.
First, to draw a transition, draw a rectangle, then a circle somewhat higher. You then use the loft command to produce the 3d solid. Now it pays to change to a different layer and draw the midlines, ie those ones halfway in as mentioned above. So, for instance you would draw a rectangle on top of the original one and offset it by 1.5mm if your metal thickness was 3mm.
same for the circle. You may need to hide the original solid to get the offset command to work.
If your circle was parallel to the rectangle, you could now issue the divide command and pick the circle and divide it into 48 pieces. You will see that nothing appears to have happened after the divide command. This is now the time to change your OSNAP to endpoint, intersection and node. This last one is important because it will pick up all the nodes (points) that were put in and that you cannot see as yet.
Issue the line command and hover over parts of your circle- you should see the nodes light up as the mouse passes over them.
Draw in your development lines-this takes a while. Now you find out the length of the small arc,ie the bit between two of the nodes. This can be done by copying the circle and the nodes off a little bit an putting in some lines to the nodes and then trimming off the circle, leaving an arc.
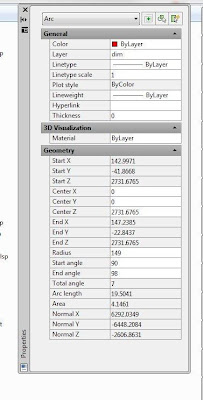
Right click on the arc and select Properties, it will give you an arc length. Write this down.
Call it Length A.
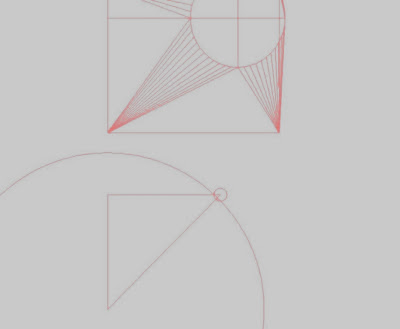
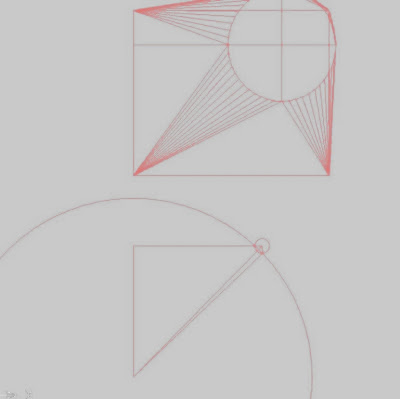
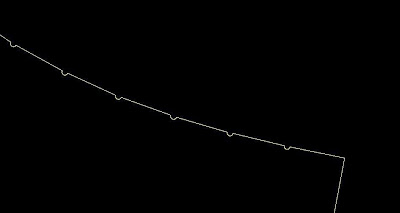
Next, start on the development, usually handy to the 3D part so you can see both at the same time. The rectangular part edge is the best place to start. You will see that there is a triangle, and the lengths of the sides are easily found through their properties, so after drawing one side, draw two circles the radii of which are these lengths. Now draw two lines from each end of the original line to where the two circles cross. Erase the circles and you are now started.
To get the part that has all the little creases, you need to do the same again, but for one of the sides of the triangle you use length A as mentioned above. All the while you are building on the original triangle. Normally, a transition gets welded up the middle so normally half has to be drawn (or a quarter if it is symmetrical).
My lisp routine (available free if anyone is interested) allows you to pick the 3d line, then it draws a circle with the radius information from that line, which does speed things up a tiny bit.
A nice finishing touch is to put 0.5mm radius circles on every intersection around the circle and then trim them out so they appear as notches. This is so the sheetmetal guy does not have to divide them out - he just folds using the notches.
Next a bit on PIDs (Process and Instrumentation Diagrams)
 If you have done any of these, you know 3 things:
1. Lines are nice to draw first, and blocks are ok to put in a drawing, but these ones always land on lines, so the inner bits have to be trimmed out.
2. There are lisp routines around that do autobreaking of the lines, but this has to be organised or downloaded or paid for. If, like me, you only do PIDs about 10% of the time, you might not bother. (Maybe I should!)
3. Autodesk make an add-on to Autocad, specifically to do PIDs. Unfortunately at NZ$3500 to upgrade from standard Autocad, and an extra NZ$300 a year this is not liable to be on the menu any time soon.
So along came one of my ideas that even I have my doubts will catch on: what if you could do a drawing just by pressing keys on your keyboard? Turns out you cannot use the arrow keys, but the rest of the keyboard is available, using a lisp routine (see below). Just issue the command PID, pick your start point, press the "o" key (make sure caps lock is OFF!) and up the line goes by 6mm. Press "l" key and off to the right it goes by 6mm. Now press 4 on the keypad-and a manual valve is inserted. Press 5 and an actuated valve is put in. "k" is to go left and "," is used to go down.
The routine uses the autcad lisp function grread - short for graphics read, which also does the keyboard. In my research trying to understand this I realised that my level of writing lisp is very low level and basic....Anyway, it does work. You could cut and paste the following code into notepad and save it as PID.lsp.
Whoops! Stop press....just tried the routine below at work and found that HP keyboards seem to have a different mapping right is 76, left is 75, up is 79. Strangely, down is still 44. Go figure.
Stop press yet again. Just realised that if you have caps lock on, then the above is the way to go.
If caps lock off, then the stuff below is OK!
;THIS DRAWS A LINE WITH VALVES FOR A PID
;BY BILL LE COUTEUR 2011
(defun C:PID()
(setq initial_point (getpoint "Pick a start Point\n"))
(setq the_x (car initial_point))
(setq the_y (cadr initial_point))
(print the_x)
(print the_y)
(while (setq the_input (grread 1 5 2))
(progn
(if (eq (car the_input) 2)
(progn
(setq key_press (cadr the_input))
(print the_input)
(print key_press)
(print initial_point)
(print the_new_point)
(if (eq key_press 108) ;to the right
(progn
(setq the_x_right ( + the_x 6))
(command "_line" (list the_x the_y) (list the_x_right the_y) "")
(setq the_orient "right")
(print "x,xright,y")
(print the_x)
(print the_x_right)
(print the_y)
(setq the_x ( + the_x 6))
);end 108 progn
);end 108 if
(if (eq key_press 107) ;to the left
(progn
(setq the_x_left ( - the_x 6))
(command "_line" (list the_x the_y) (list the_x_left the_y) "")
(setq the_orient "left")
(setq the_x ( - the_x 6))
);end 107 progn
);end 107 if
(if (eq key_press 111) ;up
(progn
(setq the_y_up ( + the_y 6))
(command "_line" (list the_x the_y) (list the_x the_y_up) "")
(setq the_orient "up")
(print "y,y-up,x")
(print the_y)
(print the_y_up)
(print the_x)
(setq the_y ( + the_y 6))
);end 111 progn
);end 111 if
(if (eq key_press 44) ;down
(progn
(setq the_y_down ( - the_y 6))
(command "_line" (list the_x the_y) (list the_x the_y_down) "")
(setq the_orient "down")
(setq the_y ( - the_y 6))
);end 44 progn
);end 44 if
;--------------------INSERTING VALVE MANUAL-----------------------------
(if (and (eq key_press 52) (eq the_orient "right")) ;valve manual to the right
(progn
(command "-insert" "vmr" (list the_x the_y) "1" "1" "0")
(setq the_x ( + the_x 6))
);end 52 progn
);end 52 if
(if (and (eq key_press 52) (eq the_orient "left")) ;valve manual to the left
(progn
(command "-insert" "vml" (list the_x the_y) "1" "1" "0")
(setq the_x ( - the_x 6))
);end 52 progn
);end 52 if
(if (and (eq key_press 52) (eq the_orient "up")) ;valve manual to the up
(progn
(command "-insert" "vmr" (list the_x the_y) "1" "1" "90")
(setq the_Y ( + the_Y 6))
);end 52 progn
);end 52 if
(if (and (eq key_press 52) (eq the_orient "down")) ;valve manual to the down
(progn
(command "-insert" "vmr" (list the_x the_y) "1" "1" "-90")
(setq the_Y ( - the_Y 6))
);end 52 progn
);end 52 if
;--------------------END OF INSERTING VALVE MANUAL-----------------------------
;--------------------INSERTING NON-RETUN VALVE FORWARD -----------------------------
(if (and (eq key_press 49) (eq the_orient "right")) ;to the right
(progn
(command "-insert" "VNFR" (list the_x the_y) "1" "1" "0")
(setq the_x ( + the_x 6))
);end 49 progn
);end 49 if
(if (and (eq key_press 49) (eq the_orient "left")) ;to the left
(progn
(command "-insert" "VNFL" (list the_x the_y) "1" "1" "0")
(setq the_x ( - the_x 6))
);end 49 progn
);end 49 if
(if (and (eq key_press 49) (eq the_orient "up")) ; to the up
(progn
(command "-insert" "VNFR" (list the_x the_y) "1" "1" "90")
(setq the_Y ( + the_Y 6))
);end 49 progn
);end 49 if
(if (and (eq key_press 49) (eq the_orient "down")) ; to the down
(progn
(command "-insert" "VNFR" (list the_x the_y) "1" "1" "-90")
(setq the_Y ( - the_Y 6))
);end 49 progn
);end 49 if
;--------------------END OF INSERTING VALVE MANUAL-----------------------------
;--------------------INSERTING VALVE ACTUATED-----------------------------
(if (and (eq key_press 53) (eq the_orient "right")) ;valve to the right
(progn
(command "-insert" "var" (list the_x the_y) "1" "1" "0")
(setq the_x ( + the_x 6))
);end 53 progn
);end 53 if
(if (and (eq key_press 53) (eq the_orient "left")) ;valve to the left
(progn
(command "-insert" "val" (list the_x the_y) "1" "1" "0")
(setq the_x ( - the_x 6))
);end 53 progn
);end 53 if
(if (and (eq key_press 53) (eq the_orient "up")) ;valve to the up
(progn
(command "-insert" "var" (list the_x the_y) "1" "1" "90")
(setq the_Y ( + the_Y 6))
);end 53 progn
);end 53 if
(if (and (eq key_press 53) (eq the_orient "down")) ;valve to the down
(progn
(command "-insert" "var" (list the_x the_y) "1" "1" "-90")
(setq the_Y ( - the_Y 6))
);end 53 progn
);end 53 if
;--------------------END OF INSERTING VALVE ACTUATED-----------------------------
;--------------------INSERTING VALVE CONTROL-----------------------------
(if (and (eq key_press 54) (eq the_orient "right")) ;valve to the right
(progn
(command "-insert" "vcr" (list the_x the_y) "1" "1" "0")
(setq the_x ( + the_x 6))
);end 54 progn
);end 54 if
(if (and (eq key_press 54) (eq the_orient "left")) ;valve to the left
(progn
(command "-insert" "vcl" (list the_x the_y) "1" "1" "0")
(setq the_x ( - the_x 6))
);end 54 progn
);end 54 if
(if (and (eq key_press 54) (eq the_orient "up")) ;valve to the up
(progn
(command "-insert" "vcr" (list the_x the_y) "1" "1" "90")
(setq the_Y ( + the_Y 6))
);end 54 progn
);end 54 if
(if (and (eq key_press 54) (eq the_orient "down")) ;valve to the down
(progn
(command "-insert" "vcr" (list the_x the_y) "1" "1" "-90")
(setq the_Y ( - the_Y 6))
);end 54 progn
);end 54 if
;--------------------END OF INSERTING VALVE CONTROL-----------------------------
);end if progn
);end if
);end progn
);end while
);end func